
Edit, Convert and Create PDF on Mac with iSkysoft PDF Editor Pro for Mac
PDF files, (Portable Document Format) enable you to present and share documents with ease. However, they can be a problem to work with. If you have a PDF reader on your Mac, you might have realized that you are unable to write or save content in PDF format. To deal with PDF files, you must have a reliable PDF editor, such as iSkysoft PDF Editor Pro for Mac.
This isn’t just a simple PDF Editor, it’s a powerful, complete, all-in-one PDF solution that allows you to edit, markup, annotate, secure, share, create and convert PDF files, edit and convert scanned PDF files, and fill and create PDF forms with just a few clicks. This is actually the best PDF program available on the web with greatest PDF manipulation tools ever made. Once you have installed this fantastic software on your Mac, you’ll have full control over any PDF files (PDF forms, PDF documents, Scanned PDF files and more).
Key Features of iSkysoft PDF Editor Pro for Mac
1. Vast Editing Tools
iSkysoft PDF Editor Pro for Mac comes with multiple PDF editing tools that allow you to align and distribute texts fields within PDF, delete, add, extract, replace or crop images with just a few clicks. With the editing tool, you can also insert, delete, rotate, replace, crop, rearrange, organize, split or combine PDF pages, and merge an unlimited number of files into one PDF.
2. Excellent Markup and Annotation Tools
With this amazing software installed on your Mac, you will be able to use multiple markups and annotation tools to express your thoughts. You can highlight, underline and strikethrough specific lines in a PDF, add sticky notes, texts or callout comment, change PDF texts or background to your preferred color or image, batch watermark PDF or remove the watermarks from PDF and remove various types of annotations from a PDF file with ease.
3. Helps You Secure PDF’s
iSkysoft PDF Editor Pro for Mac gives you multiple ways for enhancing the security of your PDF documents. You can add passwords and permissions in batch to restrict others from viewing or editing your files, place custom stamps to PDF so as to help others identify the owner, digitally sign PDF files with personalized handwriting or image signature and redact PDF files to remove all the sensitive texts, images, and pages from your PDF document permanently.
4. Share PDF Files through Modern Methods
Users can share files with friends and family members using three modern and simple methods. You can attach PDF documents to your email, print out PDF within the program with customized print options or upload PDF file directly to Dropbox. If your PDF document is too large to upload to Dropbox, you can still compress it into a small size using the same software. You have the option to preview the result before compressing, and the output compressed file retains its original quality.
5. Edit and Convert Scanned PDF Files
A fast and accurate OCR technology used in iSkysoft PDF Editor lets you edit, copy or search scanned PDF documents with ease. This feature also allows conversion of symbols and numbers to texts. Generally, you can convert scanned PDF files to all popular formats such as Excel, PowerPoint, HTML, EPUB, plain texts and images. OCR feature also supports multiple languages such as Spanish, German, Turkish and more.
6. Excellent PDF Form Filler and Creator
The software lets you fill out both the interactive and non-interactive PDF forms and edit them effortlessly. Once you have entered data into the text fields, you can import or export the content with ease. Moreover, iSkysoft PDF Editor Pro for Mac also allows you to create PDF forms by freely adding text fields and buttons and then viewing the field form properties and tab numbers. Note that iSkysoft offers free PDF form templates for download.
7. Create and Convert PDF Documents
You can create PDF files from existing PDF’s, images, web pages, EPUB and other forms of texts. The files can be edited and marked up before they can be saved to PDF format. Users can also convert PDF files to Word, PowerPoint, Excel, EPUB, HTML, Rich Text, Plain Text, and images. The output file retains its original layout.
Step-by-step Guide on How to View, Edit, Convert and Create PDF with iSkysoft PDF Pro For Mac
How to Import PDF File
Once you have successfully downloaded, installed and launched the software, click on the “Open File” button located on the main interface. You will then be directed to the folder with all your PDF files. Identify the PDF file that you would like to upload to the program and click “Open.”

Alternatively, you can click on the blank space within the program and then drag and drop the files to the interface. Your files will then be automatically uploaded.

How to View PDF
Once your files have been successfully uploaded, you can view them using different display options offered by this amazing software.
1. Page Display
Click the “View” tab located on the menu bar and then select the “Page Display” option on the content menu that appears. You will then see the “Single Page View,” “Enable Scrolling,” “Two Page View and “Two Page Scrolling.” Select the appropriate option.

2. Page Zoom
Click on “View” tab from the menu bar then select “Zoom” to access various zooming option.

3. Page Navigation
Go to the main menu, and click on the “View” icon, then on the drop-down menu that appears, select the “Page Navigation” option to find the navigation options.

How to Edit PDF
A. Edit PDF Texts
1. Modify Texts
Click on “Edit” tab on the toolbar and then identify and double click texts to modify, copy or delete them.

2. Add Text
Click on “Edit” and select the “Add Text” option located at the top left of the program, (Appears like a letter T). Click the place where you would like to add texts and then start typing the content.

B. Edit PDF Images
To edit images, just click on “Edit” and then double click on the image to have access to editing options (Crop, Extract and Replace images)
1. Add Images
Click “Edit” then select the “Add Image” button. You can then click on the location where you would like to add texts within the PDF file. The software will direct you to the folder with your images. Select your desired image and click the “Open” button. Adjust the image to fit the selected location.

2. Replace Image
Click on “Edit” and double click the image that you want to replace. A dialogue box will then appear. Just click on “Replace Image” and then select the image that you would like to replace it with.

3. Extract Image
Click on “Edit” and double click the image. Click on “Extract Image” on the dialogue box. Select the image destination and the name.

4. Crop Image
Click on “Edit” and double click on the image you want to crop. Click on “Crop Image,” adjust the image to your preferred size and then click “Crop.”

C. Edit PDF Pages
Click on “Pages” located on the right-hand side of the program’s interface to get the editing options
1. Rotate Pages
“Rotate Pages” option is located just under the “Pages” icon. Click on it and then enter the specification, direction and page range. Click on the “OK” button to apply changes.
https://images.iskysoft.com/mac-pdf-editor/mac-pdf-editor-rotate1.png
2. Delete Pages

Go to “Pages” and click on “Delete Pages”. You can then enter the pages you want to eliminate, by selecting odd or even pages, and then click on the “OK” button.
3. Extract Pages
Click on “Pages” and scroll down to the “Extract Pages” option. A dialogue will then appear giving you various options of pages you want to extract. You can select all pages or specify.
https://images.iskysoft.com/mac-pdf-editor/new-pro/extract-pages.jpg

4. Replace Pages
Click on “Pages” and select “Replace Pages” Enter the pages of the PDF file you want to replace and then search the PDF file that you want to replace it with. You can also enter the pages you want to replace it with.

5. Crop Pages
Go to “Pages” and select “Crop Pages.” Provide the size you want to crop the pages into then click on “Crop.” Alternatively, you can also click on the page and just drag to resize it.
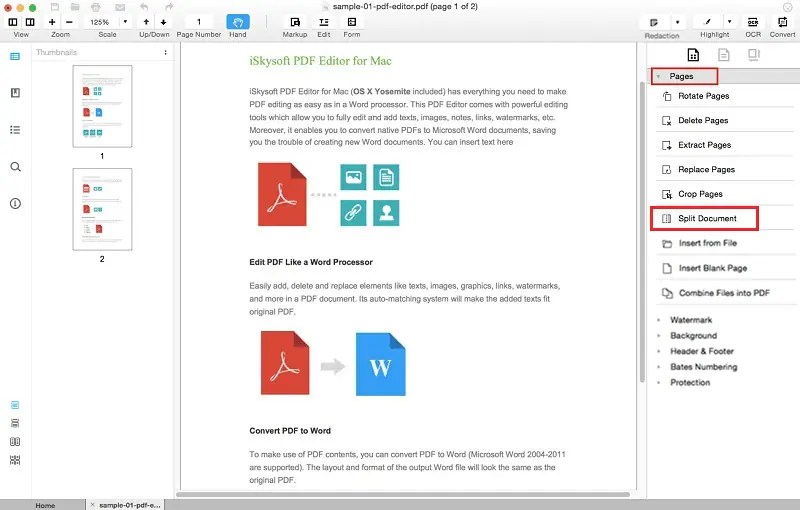
D. Merge and Split PDF
1. Split PDF
On the right side of the software’s interface click on “Pages” and select “Split Documents.” Input the split options. You can split by the number of pages/ odd or even pages. Click on the “OK” button.
2. Merge PDF
Click on “Combine Files” after opening the program on your Mac. Click on “Add Files” on the pop-up that appears, upload the files to be merged and then click on “Combine.”Alternatively, go to File> Create> Combine Files

E. PDF Watermarks
1. Add Text, Image or PDF Watermark
Click on “Add Watermark” option under “Watermark menu. You will be provided with the kind of watermark you want to “Add.” Select text, image or PDF watermark based on your preference.
2. Update Watermark
Click on “Watermark” and select “Update.” Indicate the pages you would like to apply the watermark. Update from image to PDF to texts and vice versa.
3. Remove Watermarks
Click on “Watermarks” then select “Remove.” A pop-up will then appear asking you if you would like to delete the watermarks permanently. Click “OK” to remove the watermarks.
F. Change PDF Color
1. Add Color, Image and PDF Background
Click on “Background” and select “Add” option.
https://images.iskysoft.com/mac-pdf-editor/change-pdf-background-color-01.png
Select the color to add to PDF background from the command box that appears. You can also select an image to appear on the background of your file and then click on the “OK” button.

2. Remove Background
Click on “Background” then select “Remove.” Confirm the removal by clicking the “OK” button on the dialogue box that appears.

How to Convert PDF
Select the “Convert PDF” button located on the primary window and drag the files you would like to convert to the pop-up window. Select your preferred output format then click on the “Convert” button. iSkysoft PDF Editor Pro for Mac supports batch conversion of PDF files.
https://images.iskysoft.com/mac-pdf-editor/new-pro/convert-pdf-01.png
Alternatively, click on “Open File” button from the primary interface and select the “Convert” button on the top right corner. You can then choose the output format in the pop-up window.
How to Create PDF
1. Create PDF From a Single File
Click on “Create PDF file, upload a single file and then click “Save As” to save the file as a PDF.

2. Create PDF from Multiple Files
Click File> Create> Combine File into PDF and then upload all the files that you would like to create as a PDF file, then click on “Combine.” All the files will be successfully combined into a single PDF file. Alternatively, click on the “Combine Files” on the home window and “Add Files.”

3. Create Blank PDF
On the software’s main menu, click on “File> Create> Blank Document.


Thanks for your sharing, great article.
Thanks for the comment